Monday, January 30, 2012

{Baby Boy Canvas}

I just finished this canvas for a super sweet little man about to be born!  Little Lincoln won't arrive for a few more weeks but I am so excited to give the parents this canvas to match their pirate bedding from Babies R us called Pirate Party.  I matched the colors and hopefully this will hang in their nursery!
I started by taping off lines with painters tape on my 18x24 canvas.  I didn't even measure here.  I kinda wanted the "unperfect" look that different sized lines would create.  Crazy enough though the lines weren't that far off in sizing so my goal wasn't truly achieved.
Pull off that tap after 3 coats of each color (that red was horrible by the way because it streaks on a canvas)
I did the edges so that when you see it from the side it looks nice
These are the colors that I used.  Notice that I have a combo of brands.  It was whatever I had on hand!
My final project!  I have to admit that this canvas took FOREVER to paint.  Not because it was hard, but because I didn't "think" about painting over stripes.  I attempted to first paint the name in brown.  Well, that didn't show up so then I went with black.  Well, you couldn't read the freakin font then.  My husband said that he didn't like the font anyways (I disagree although it is hard to read but love his heart he was trying to help).  So then I ran to the craft store and bought a paint pen and went around the letters like 5 times to get the white to show up.  
**So my final comment on this canvas is that it might look cute, but if you paint stripes go ahead and do vinyl over top, not paint.  Otherwise you will be in the same place I was--it won't show up over the colors.  Or better yet, don't put a dark color like navy right in the middle of the canvas.  Put it at the bottom so black or brown paint will show up!**

{Calendar Frame}

Ok, I love this project and to be honest I am a little upset it is a gift and not for myself!  A reusable wipe off frame for monthly use!  In love!
This little bit of {fabulous} is a frame that I made into a family calendar!
I got the frame at Joanne's with a 50% off coupon--$15.  I took the frame and used a Visa Vis marker and drew lines on the front of the glass (this removes very easily with window cleaner or even water).  Measuring ended up being easier than I thought although I did have to draw out the measurements on a sheet of paper before I actually began the project.  I then flipped the glass over and put vinyl over top the lines on the front.  Made it super easy to get the lines drawn since I used a ruler on the front to get the lines straight. 

My final product turned out better than expected I have to say!  I had found an example on another blog where they actually took an old frame and painted it but I figured I would let someone else do that work for me-plus this frame is a nice clean look. 
Super happy with the results!  Now to just make one for myself!
**Reminder** Flip over your words when printing on a Cricut because you are putting it on the back side of the glass!  Seems like it would be easy to remember but what a waste of vinyl if you forget!

Sunday, January 29, 2012

{Be Mine} blocks

Here are a few pics of my Valentine blocks I made.  Again, super easy.  Go to Home Depot and have a post cut into 4 in blocks.  Remember the wood has to dry out first though so do this a week or so in advance before your craft needs to be done. 
Paint your blocks white underneath and then sand the edges really good to get them distressed.  Add your vinyl and you are done!  I used the font "smiley monster" on this set.  It is my kid font that I love!


{Valentine Subway Art}


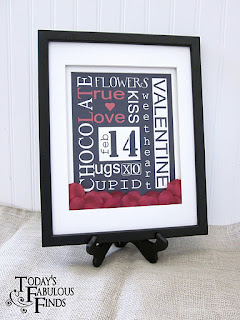
I am So addicted to Subway art!  I love that I can print these off or send to a quick photo place, slap them in a frame and be done.  Super cheap and super fabulous! Click on above pic for link to this slice of heaven!
here is another. Click here for this one!

Another fabulous creation by eighteen 25.  Click Here for the site to download.
This one is adorable too--plus you have 4 different color choices!  Thanks bloominghomestead for this adorable and different subway art printable!


{Springing for Subway Art}

I know it is early, but spring is around the corner!  I found these fabulous {AND FREE} subway art designs for Spring.  In love!
This is from Eighteen 25.  Click Here to go to their site!

I love this one too.  This one is less bright, but would match my home better.  Head on over to  craftaholicsanonymous to download this bad boy.


Tuesday, January 24, 2012

{Party of 4]

I got this idea from Brown Paper Packages and fell in love.  I changed a few small things, but basically it is the same idea!
Materials Needed:
4x4 wooden squares (I went to Home Depot and got a post cut into squares and yes, the guy did look at me like I was crazy)
Paint (I used acrylic) or Spray Paint
Foam brush (if you use paint and not spray paint)
Vinyl (I used black)
A Sander (I use my little mouse)
Optional ribbon

I first put on 2 coats of white paint.  I do this so when I sand the color underneath is white and not wood although the wood looks pretty darn good too.


Next came 2 coats of whatever color you are doing.  I did a suede color (basically tan) but next time I am going to do black to mix it up a little
After that dries go to town and back with your sander.  I literally just sand around the edges and hit up the surfaces.  Total time of sanding equals less than 3 minutes probably.  Remember after sanding to wipe all the powder off or your vinyl won't stick plus you will just have a hot mess of shavings in your house!


Apply your vinyl~no need to put anything on top to seal it, but you could if you wanted.  I like the rough look of the wood and didn't want it shiny.  You could matte mod podge if you wanted though.
One other idea I thought about was putting on one block "Party of 4".  That might be on my next set I make!
Last tie a ribbon around the blocks so you can give them and they stay together. 

I'm taking this Saturday to a party for the hostess and I am 99% sure she will {love} them!

Sunday, January 22, 2012

{Navy Canvas}

My friend said that she had ordered the Pottery Barn Kids Bedding in Harper and I had already told her I would do a canvas for the room.  I wanted Clean lines since this bedding is basically just white with navy lines~nothing Cute or Fun~it is very pretty though.  Makes me want to redo my son's room in Navy!

Here is the canvas I used--pretty big!  Love this size and how cheap!  I think it was like $10 for 2 canvases!


Wondering why in the world I used 2 different types of navy paint?  Oh that would be because I had a bottle of navy then ran out to the craft store and thought I should have another as backup.  Got home and realized that I didn't have the same brand~and the navy colors were not alike in any way (shocking how off they were from each other).  Anyways, I just mixed them together and now I have a ton of Navy Blue paint in a baby food jar stored away.
The most challenging thing about this bad boy was figuring out the measuring (I don't pride myself in being good with sizes and straight lines).  You can see the ruler in the background.  I had great intentions of doing all this stuff with spacing~but in the end I ended up using painters tape.  I just laid it down and then did second stripe 2 1/2 inches apart.


Next I simply used my Cricut machine and cut out a 11x11 vinyl inch letter "S" in American Typewriter font.  It is my go-to font for things like this that you don't want baby or so swirly.  Now getting this centered wasn't easy and I'm pretty sure it really isn't centered, but you can only move something so many times till you go crazy.  I consider this my stencil in reverse style


Let's paint!  Normally I would spray paint this~which I cursed myself for not doing at the time.  Not that this is challenging in any way, but spray paint takes like 2 minutes and paint takes like 10.  Big deal right?
Coat of paint #2Watch out here because this is when that tape and vinyl letter start arching up off the canvas and you have to lightly press it back down to stick.
Pull off the tape and vinyl and {FABULOUS} appears!  

Look at my edges though?  I am still unhappy that for some reason I decided to paint the sides after I told myself not to!  I got to singing while painting and totally forgot.  Now my lines are all jacked up.


See?  Boo on this.  So, I took my foam brush and dipped away in the paint to straighten the line as best as I could.

Finished Product.  I am happy.  Now I have to wrap it and give it to the mother-to-be at her shower next month. 

Thursday, January 19, 2012

{Super Fun (Cheap) Distressed Frame

{LOVE LOVE LOVE} This frame!
I guess I should have put a picture in the frame before posting--but I can't decide if I get to keep the frame or give to to a friend for her birthday!
 
I got this frame for $4 at the craft store.  It came naked {plain wood} so I painted on a layer of white paint then tossed on 2 coats of Rainy Day Gray paint.  After drying I simply took my little Mouse sander and went to town sanding the edges to distress the frame. 
I love this look for aging (especially when you pay under $5 for the frame and now it looks like I got it at a boutique!)
I originally bought this "P" to put on this frame, but I think it is a little large.  Before I keep it or give it I am thinking I will probably just cut out some vinyl letters and do some initials or better yet I might do the whole "est. 2002" wedding date thing and put a family picture in the frame. 

{Random Material Wreath}

Got this wreath at the Dollar Tree for a buck!  Can't beat that!  It is 13 inches.
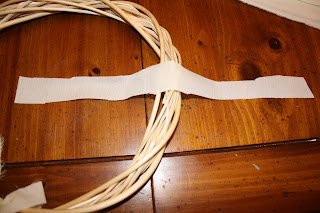
Start taking by taking your material and laying it across the wreath.  I didn't measure the length or even the width of the ribbon I just cut away.  The different lengths and widths add dimension to the wreath.  I think I precut like 60 strips (I doubled the material up so even though 6o sounds like a lot it took like 3-5 minutes to cut it all out)
Wrap the material around crossing it on the back of the wreath.
Simply bring the material to the front and tie a simple knot.  And Wham!  You are on your way to making a wreath!
My pile of material that I cut
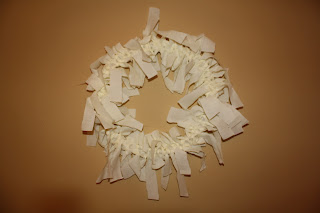
Keep knotting the material until you cover the entire wreath.  For the random spots you have that look not "full" simply cut smaller strips and do a quick knot around and fill in the blanks instead of wrapping it like before.  This also adds some dimension since these strips will be shorter.
I had a letter "P" that I had just painted and sanded and I sat it inside the wreath and it looks fabulous!  Now to find a place to hand the wreath on the wall!  Next time I will def make the wreath larger to I can hang it on my door.  Looks like I am headed to the craft store!  The 13 in is great for a small accent wreath needed for one of those spaces you need just a little something extra!